벌써 7번째 글이다..!
개인 프로젝트를 하면서 글 작성을 시작한 이유는 개발하면서 알게 된 것들을 시간이 지나면 잊어버리게 되기 때문에,
나중에 다시 보면서 기억하기 위해 시작하였다. + 끝을 보기 위해서..
어제오늘은 대략적인 화면 UI 구성과 api 통신을 구현하였다.
메인화면 Todo UI
저장소 추가 화면 UI
두 화면 모두 CollectionView + Diffable Data source를 활용하였다.
왜냐하면 애플이 테이블 뷰를 사용하지 않고 컬렉션 뷰로도 리스트를 '유연하게' 구현할 수 있게 했기 때문에 이를 활용하였다.
diffable data source는 기존의 reloadData 방식의 단점을 보완하고, 데이터가 변경될 때마다 애니메이션 🥰 이 자동으로 보이기 때문에 사용해보았다.
메인화면 Todo UI

완성된 화면도 아니고 초안!이지만 어떻게 구성했는지 기록해놓으려고 한다.
저번 글에서 윗부분은 stackView (NEULiee , + , 메뉴) 로 구성하였다.
collectionview의 leading, bottom, trailing 은 safeLayoutGuide 의 anchor를 따랐다.
처음에는 layoutMarginsGuide를 따랐는데 너무 공간이 좁아 보여 바꿨다. (차이점은 글로 다시 정리하자)
collectionView 구성
typealias DataSource = UICollectionViewDiffableDataSource<Repository, Todo>
typealias Snapshot = NSDiffableDataSourceSnapshot<Repository, Todo>
데이터 소스의 section 은 Repository 로, item 은 Todo 로 구성하였다.
이 두 가지 객체는 Realm에 저장하기 위해 Object 객체로 선언하였는데 이 때문에 Hashable 프로토콜을 채택하지 않아도 Hashable 해서 데이터를 구분하는데 사용할 수 있었다.
살짝 의문은 Realm 객체를 직접 사용해도 문제가 없는지 인데 우선은 잘 작동한다. 아직 기능 구현을 하지 않았기 때문에 끝날 때까지 유지될지는 모르겠다.
collectionview 구성 순서는 다음과 같다. 이렇게 보니 구성해서 적용하는 것뿐이다.
1. layout 구성
2. cell 구성
3. header 구성
4. snapshot 적용
5. datasource 적용
func configureCollectionView() {
    // 1. collection view configuration
    let listLayout = listLayout()
    collectionView = UICollectionView(frame: .zero, collectionViewLayout: listLayout)

    // UI
    addCollectionViewInTodoView()

    // 2. cell registration
    let cellRegistration = UICollectionView.CellRegistration(handler: cellRegistrationHandler)

    dataSource = DataSource(collectionView: collectionView, cellProvider: {
        (collectionView: UICollectionView, indexPath: IndexPath, itemIdentifier: Todo) in
        return collectionView.dequeueConfiguredReusableCell(using: cellRegistration, for: indexPath, item: itemIdentifier)
    })

    // 3. header registration
    let headerRegistration = UICollectionView.SupplementaryRegistration
    <TodoHeader>(elementKind: TodoHeader.elementKind, handler: headerRegistartionHandler)
    dataSource.supplementaryViewProvider = { [unowned self] supplementaryView, elementKind, indexPath in
        return self.collectionView.dequeueConfiguredReusableSupplementary(using: headerRegistration, for: indexPath)
    }

    // 4. update snapshot
    updateSnapshot()

    // 5. datasource 적용
    collectionView.dataSource = dataSource
}
1. layout 구성
func listLayout() -> UICollectionViewCompositionalLayout {
    var layoutConfiguration = UICollectionLayoutListConfiguration(appearance: .plain)
    layoutConfiguration.headerMode = .supplementary
    layoutConfiguration.backgroundColor = .clear
    return UICollectionViewCompositionalLayout.list(using: layoutConfiguration)
}
컬렉션 뷰 생성자에 (collectionViewLayout) 레이아웃을 적용해서 생성하기 위해서
UICollectionViewCompositionalLayout 을 생성하였다.
이를 위해서 UICollectionLayoutListConfiguration (컬렉션 리스트 구성) 을 생성하고 설정하면 된다.
todo 화면마다 header 부분 [저장소 이름 + 할 일 추가하기 버튼] 을 구성하기 위해서
headerMode 를 supplementary 로 설정해 직접 커스텀해주었다.
UICollectionViewCompositionalLayout 을 리스트로 반환해주면 리스트 레이아웃이 완성~
2. cell 구성
func cellRegistrationHandler(cell: UICollectionViewListCell, indexPath: IndexPath, todo: Todo) {
    var contentConfiguration = cell.defaultContentConfiguration()
    contentConfiguration.text = todo.content
    contentConfiguration.textProperties.font = UIFont.Font.light14
    cell.contentConfiguration = contentConfiguration

    var doneButtonConfiguration = doneButtonConfiguration(for: todo)
    doneButtonConfiguration.tintColor = .mainColor
    cell.accessories = [.customView(configuration: doneButtonConfiguration)]
}

private func doneButtonConfiguration(for todo: Todo) -> UICellAccessory.CustomViewConfiguration {
    let symbolName = todo.isDone ? "circle.fill" : "circle"
    let symbolConfiguration = UIImage.SymbolConfiguration(textStyle: .title1)
    let image = UIImage(systemName: symbolName, withConfiguration: symbolConfiguration)

    let button = TodoDoneButton()
    button.addTarget(self, action: #selector(touchUpInsideDoneButton(_:)), for: .touchUpInside)
    button.todo = todo
    button.setImage(image, for: .normal)
    return UICellAccessory.CustomViewConfiguration(customView: button, placement: .leading(displayed: .always))
}
cell 을 구성하는 부분은 애플의 modern collection view 와 튜토리얼을 참고하였다.
CellRegistration 을 생성하는 부분에서 handler 로 바로 작성해도 되지만
가독성을 위해 cellRegistrationHandler 함수로 따로 구성하였다.
여기서 cell 은 todo 하나하나를 구성하므로 todo의 내용과, todo 를 완료했는지에 대한 doneButton 조합으로 셀을 구성하였다.
알게 된 점은 cell 의 accessories 를 배열로 구성하여 uiCollectionViewListCell 을 커스텀할 수 있다는 점이었다.
accessories
https://developer.apple.com/documentation/uikit/uicollectionviewlistcell/3600458-accessories
3. header 구성
func headerRegistartionHandler(headerView: TodoHeader, elementKind: String, indexPath: IndexPath) {
    let headerItem = dataSource.snapshot().sectionIdentifiers[indexPath.section]
    headerView.repositoryLabel.text = headerItem.name
    headerView.touchUpInsideAddButton = { [unowned self] in
        addTodo(repository: headerItem)
    }
}
TodoHeader
import UIKit

class TodoHeader: UICollectionReusableView {

    static var elementKind: String { UICollectionView.elementKindSectionHeader }

    let repositoryLabel = UILabel()
    let addButton = UIButton(type: .contactAdd)

    var touchUpInsideAddButton: (() -> Void)?

    override init(frame: CGRect) {
        super.init(frame: frame)
        configureUI()
    }

    required init?(coder: NSCoder) {
        fatalError("Not Implemented")
    }
}

extension TodoHeader {

    private func configureUI() {

        let stackView = UIStackView()
        stackView.axis = .horizontal
        stackView.distribution = .fill
        addSubview(stackView)
        stackView.translatesAutoresizingMaskIntoConstraints = false

        NSLayoutConstraint.activate([
            stackView.leadingAnchor.constraint(equalTo: layoutMarginsGuide.leadingAnchor),
            stackView.trailingAnchor.constraint(equalTo: layoutMarginsGuide.trailingAnchor),
            stackView.topAnchor.constraint(equalTo: layoutMarginsGuide.topAnchor),
            stackView.bottomAnchor.constraint(equalTo: layoutMarginsGuide.bottomAnchor)
        ])

        repositoryLabel.font = UIFont.Font.light14

        stackView.addArrangedSubview(repositoryLabel)

        addButton.tintColor = .mainColor
        addButton.setTitleColor(.mainColor, for: .normal)
        addButton.setTitle("할일 추가하기", for: .normal)
        addButton.titleLabel?.font = UIFont.Font.light12

        addButton.addAction(UIAction(handler: { [unowned self] _ in
            self.touchUpInsideAddButton?()
        }), for: .touchUpInside)

        stackView.addArrangedSubview(addButton)
    }
}
header 구성은 아래의 첫 번째 링크를 참조하였다.
header Registration (SupplementaryRegistration) 을 미리 만들어둔 TodoHeader 로 설정하였다.
TodoHeader 는 스택뷰로 구성하였다.
핸들러는 데이터 소스의 스냅샵에서 section identifier 로 Repository 를 가져와 헤더 뷰에 라벨과 버튼의 기능을 정의해주었다.
4. snapshot 적용
func updateSnapshot() {
    var snapshot = Snapshot()
    snapshot.appendSections(repositories)

    for repository in repositories {
        snapshot.appendItems(Array(repository.todos), toSection: repository)
    }

    dataSource.apply(snapshot)
}
간단하게 적용할 수 있다. Section 에 repository를 추가하고 각 repository 마다 todo를 item으로 넣어주고 적용하면 된다.
5. datasource 적용
collectionview 에 만든 datasource를 적용한다.
프로젝트가 끝날 때까지 바뀐 부분이 있다면 수정 예정
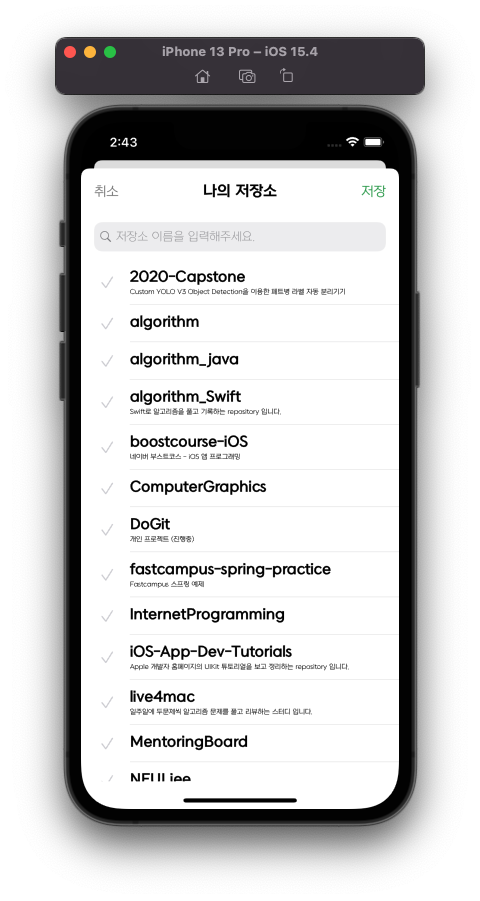
저장소 추가 화면 UI
메인화면 UI랑 상당히 비슷하다 ㅎㅎㅎ
API 파싱 오류
저장소 추가 화면을 만들기 위해 github api 를 사용하여 id, name, description을 불러오는 도중에 JSON Decoder 파싱 오류가 계속 발생했다.
원인을 찾기 위해서 api 호출된 json을 살펴봤는데 id, name 은 필수값이지만 description 은 null 값이 올 수도 있다는 점을 발견했다.
struct GithubRepository: Codable, Hashable {
    let id: Int64
    let name: String
    let description: String?

    init(_ id: Int64, _ name: String) {
        self.init(id, name, "")
    }

    init(_ id: Int64, _ name: String, _ description: String) {
        self.id = id
        self.name = name
        self.description = description
    }
}
description 이 null (nil) 값이 올 수도 있다는 것을 표시하기 위해서 옵셔널 타입으로 바꿔주었고,
값을 받아서 배열을 생성할 때 빈 값을 넣어주기 위해 생성자를 따로 생성하였다.
화면 UI 구성 - 네비게이션 바
저장소 추가화면 UI 는 [ 네비게이션 바 + 서치바 + 컬렉션 뷰 ] 로 구성하였다.
모달화면에 네비게이션 바를 추가하기 위해서 네비게이션 컨트롤러를 생성하여 루트뷰로 설정해주어야했다.
안그러면 네비게이션 바에 타이틀, 바 아이템 (취소, 저장) 추가가 안된다.
@objc func touchUpInsideAddButton(_ sender: UIButton) {
    let addRepositoryViewController = AddRepositoryViewController()
    let navigationController = UINavigationController(rootViewController: addRepositoryViewController)
    self.present(navigationController, animated: true)
}
네비게이션 바의 폰트변경이 생각보다 복잡했다.
NSAttributedString.Key.font 를 사용해 새로운 attribute 를 만든 후 각각의 textAttributes 에 지정해주어야했다.
// MARK: navigation bar
let barAttribute = [NSAttributedString.Key.font : UIFont.Font.regular16]
let titleAttribute = [NSAttributedString.Key.font : UIFont.Font.bold18]
navigationItem.title = "나의 저장소"
navigationController?.navigationBar.titleTextAttributes = titleAttribute

let cancelBarButton = UIBarButtonItem(title: "취소", style: .plain, target: self, action: #selector(didCancelAdd(_:)))
cancelBarButton.tintColor = .gray
cancelBarButton.setTitleTextAttributes(barAttribute, for: .normal)
navigationItem.leftBarButtonItem = cancelBarButton

let saveBarButton = UIBarButtonItem(title: "저장", style: .plain, target: self, action: #selector(didSaveRepository(_:)))
saveBarButton.setTitleTextAttributes(barAttribute, for: .normal)
navigationItem.rightBarButtonItem = saveBarButton
saveBarButton.tintColor = .mainColor
화면 UI 구성 - 서치바
UISearchBar 를 사용하였다.
화면 UI 구성 - 컬렉션 뷰
func updateSnapshot() {
    var snapshot = Snapshot()
    snapshot.appendSections([0])
    snapshot.appendItems(githubRepositories)

    print(#function)

    dataSource.apply(snapshot)
}
위의 방법과 거의 동일하고, 여기서는 section 이 하나만 필요하기 때문에 Section만 하나로 설정해주었다.
프로젝트가 끝날 때까지 바뀐 부분이 있다면 수정 예정
참조
https://swiftsenpai.com/development/list-interactive-custom-header/
UICollectionView List with Interactive Custom Header - Swift Senpai
This article will teach you how to create a custom header, make it interactable, adjust its height, and show it in a UICollectionView list.
swiftsenpai.com
Apple Developer Documentation
developer.apple.com
https://developer.apple.com/tutorials/app-dev-training
Apple Developer Documentation
developer.apple.com
'iOS > PROJECT' 카테고리의 다른 글
| [두깃] 출시하기 까지 (2) | 2022.05.02 |
|---|---|
| [두깃] 저장소 추가화면 (CollectionView list + Diffable DataSource) 기능구현 (1) | 2022.04.22 |
| [두깃] 에러처리 (Result) (0) | 2022.04.14 |
| [두깃] 재밌는거 하는날 (0) | 2022.04.13 |
| [두깃] 오류 고치는 날 (constraint, Realm migration) (0) | 2022.04.11 |

