https://developer.apple.com/tutorials/app-dev-training/creating-a-list-view
Apple Developer Documentation
developer.apple.com
Apple UIkit tutorial을 보고 배운 내용을 정리한 글입니다.
Configure the Data Source - diffable data source
이전글에서 만들었던 collection view 의 data source 로 difable data source 를 사용했습니다.
diffable data source 라는 것을 처음 봤는데 데이터가 변경될 때 사용자 인터페이스를 업데이트하고 애니메이션 효과를 준다고 합니다.
사실 여기가 굉장히 복잡해서 (저에게는ㅎㅎ) 정리를 하려고 글을 끄적여봅니다.
typealias DataSource = UICollectionViewDiffableDataSource<Int, String>

var dataSource: DataSource!
우선 collection view 에 data source 가 필요하니 UICollectionViewDiffableDataSource 라는 데이터 소스를 생성해줍니다.
또 Quick Help 를 살펴보면
UICollectionViewDiffableDataSource
The object you use to manage data and provide cells for a collection view.
1. 데이터를 관리하고
2. cell 을 제공하는 객체이다.
라고 되어있습니다.
그리고 밑에 길게 써져 있는 말을 보면 좀 더 자세한 설명을 제공합니다.
diffable data source 객체는 collection view 객체와 함께 작동하는 특수한 유형의 데이터 소스이고,
collection view 의 데이터 및 UI 에 대한 업데이트를 간단하고 효율적인 방식으로 관리하는데 필요한 동작을 제공합니다.
또한 UICollectionViewDataSource 프로토콜을 준수합니다.
collection view 에 데이터를 제공하기 위해서:
1. collection view 에 diffablee data source 를 연결합니다.
2. collection view 의 cell 을 구성하려면 cell provider 를 구현합니다.
3. data 의 현재 state 를 생성합니다.
4. UI에 데이터를 표시합니다.
예시)
dataSource = UICollectionViewDiffableDataSource<Int, UUID>(collectionView: collectionView) {
    (collectionView: UICollectionView, indexPath: IndexPath, itemIdentifier: UUID) -> UICollectionViewCell? in
    // configure and return cell
}
튜토리얼을 살펴봅시다!!
collection view 에 diffable data source 를 연결하려면 diffable data source 를 생성하고,
해당 data source 와 연결하려는 collection view 를 전달합니다.
또한 각 cell 을 구성하여 UI 에 데이터를 표시하는 구성을 정하는 cell provider 를 전달합니다.
연결하기 위해서 diffable data source 를 생성합니다.
typealias DataSource = UICollectionViewDiffableDataSource<Int, String>

var dataSource: DataSource!
viewDidLoad() 에서 dataSource 를 구현해줍니다.
dataSource = DataSource(collectionView: collectionView) {
    (collectionView: UICollectionView, indexPath: IndexPath, itemIdentifier: String) in
    return collectionView.dequeueConfiguredReusableCell(using: cellRegistration, for: indexPath, item: itemIdentifier)
}
그리고 cell 을 구성해서 return 해주는데 이때 dequeueConfiguredReusableCell 함수를 사용해서 cell 을 재사용해서 return 해줍니다.
이때 cellRegistration 이라는 변수를 사용하는데 이 변수는 UICollectionView.CellRegistration 변수입니다.
UICollectionView.CellRegistration 변수는 cell 의 내용과 어떻게 보여줄지 구성하는 collection view cell 의 등록자 입니다.
cellRegistration
let cellRegistration = UICollectionView.CellRegistration {
    (cell: UICollectionViewListCell, indexPath: IndexPath, itemIdentifier: String) in
    let reminder = Reminder.sampleData[indexPath.item]
    var contentConfiguration = cell.defaultContentConfiguration()
    contentConfiguration.text = reminder.title
    cell.contentConfiguration = contentConfiguration
}
애플에서 제공하는 CellRegistration 예시
let cellRegistration = UICollectionView.CellRegistration<UICollectionViewListCell, Int> { cell, indexPath, item in

    var contentConfiguration = cell.defaultContentConfiguration()

    contentConfiguration.text = "\(item)"
    contentConfiguration.textProperties.color = .lightGray

    cell.contentConfiguration = contentConfiguration
}
사실 둘 다 애플의 코드라 많이 비슷합니다.
위의 예시는 Reminder 의 테스트 데이터 title 을 가져다 썻다는 것 말고 기본 configuration 을 사용해서 만들었다!
는 점이 똑같습니다.
아무튼 이 cell registration 을 사용하여 위의 dequeueConfiguredReusableCell 로 data source 를 구현해주었습니다.
아직 collection view 의 데이터소스에 우리가 만든 데이터 소스를 제공할 수 없습니다.
data 의 현재 state 를 생성하여 넣어야 합니다. -> Snapshot
왜냐하면 저희가 쓰려는 Diffable data source 는 Snapshot 을 사용하여 collection view 및 table view 에 대한 데이터를 제공하기 때문입니다.
Snapshot (NSDiffableDataSourceSnapshot)
특정 시점의 view 에서의 data 의 상태를 나타냅니다.
아까 위에서 collection view 의 데이터 및 UI 에 대한 업데이트를 간단하고 효율적인 방식으로 관리하는데 필요한 동작을 제공한다고 적혀있었는데 아마 이 Snapshot 을 사용하여 제공하는 것 같기도 한데..?! 왜 효율적인지는 잘.. ㅜㅜ 모르겠네요,,
일단 Snapshot 을 써봅시다..
typealias Snapshot = NSDiffableDataSourceSnapshot<Int, String>NSDiffableDataSourceSnapshot 라는 새로운 객체를 쓰는군요.
snapshot 을 통해 view 에 보여줄 데이터의 초기 상태를 설정하고, 나중에 해당 데이터를 업데이트 합니다.
아직 업데이트까지는 튜토리얼이 진행되지 않았으니 초기 상태만 설정해봅시다.
var snapshot = Snapshot()
snapshot.appendSections([0])
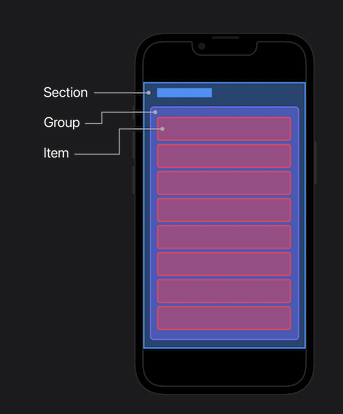
snapshot.appendItems(Reminder.sampleData.map { $0.title })Section 을 추가하고 item 을 제공합니다.
여기서 item 은 샘플 데이터의 title 만을 제공합니다.
참고)
그리고 이 snapshot 을 dataSource 에 적용하고
collection view 의 dataSource 에 적용하면 끝!
dataSource.apply(snapshot)

collectionView.dataSource = dataSource
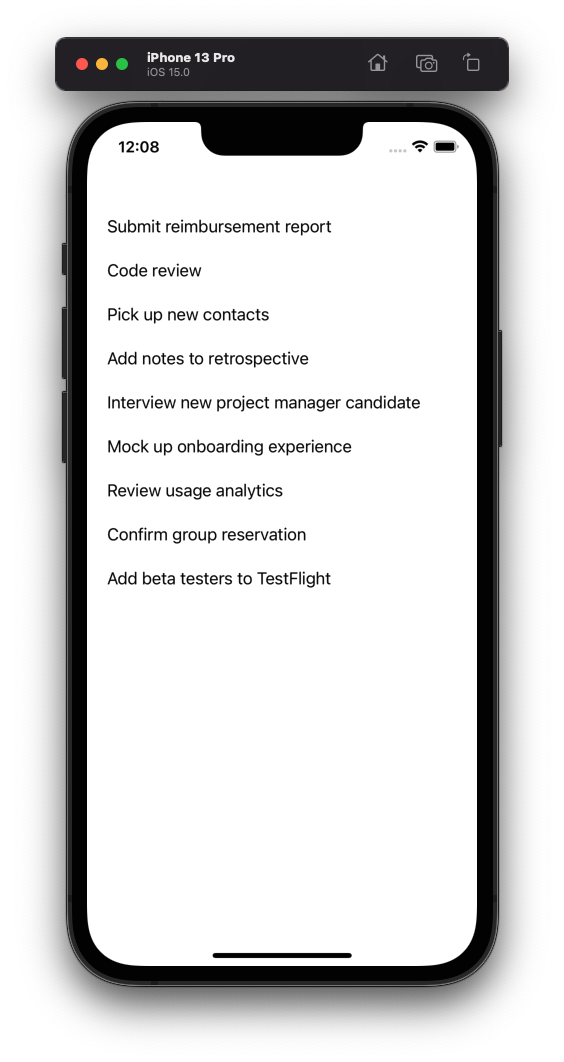
diffable data source 를 적용한 collection view 로 table view 같은 모습이 완성되었습니다. ㅎ.ㅎ
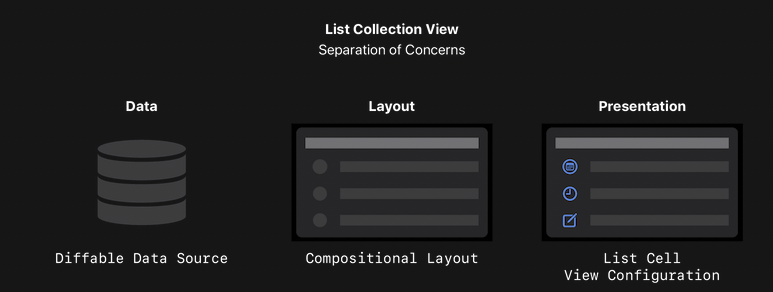
앞으로 이 코드를 이렇게 분리하여 앱을 더 쉽게 만들고 유지보수성을 높이는 방법을 배운다고 합니다.ㅎㅎ
'iOS > STUDY' 카테고리의 다른 글
| [iOS] extension + Generic where (0) | 2022.03.08 |
|---|---|
| [iOS] Format the Date and Time (0) | 2022.03.07 |
| [iOS] UICollectionViewLayout (0) | 2022.03.04 |
| [Swift] @escaping (0) | 2022.02.28 |
| [iOS] Instructions (오픈소스) - 튜토리얼 가이드 추가 (coach marks) (0) | 2021.08.02 |


